Wednesday, December 1, 2010

Oven BBQ Beef ribs with Orzo

One of my favorite things about preparing meals for my family is knowing exactly what's in it. When my crazy busy schedule allows, I prefer to make the foods they eat rather tha buy it ready-made. So for this recipe, I'll be using beef ribs from the cows we raised this summer. If you've bought a side or a 50lb. variety pack from us, this recipe might be extra handy for you!

We cook ribs a lot but always pork ribs. This was my first foray into making beef ribs. Lets begin with preparing the BBQ sauce. With a small saucepan and the following ingredients, we're ready to rock.

The Gear
  • small saucepan
  • spoon
  • measuring cups & spoons
  • small spatula
The Goods
  • 1 Cup ketchup
  • 2 tbsp. cider vinegar
  • 2-3 tbsp. maple syrup
  • 1 tbsp. Worcestershire
  • 1 tsp. chili powder
Place all ingredients into the saucepan and bring to a boil. Reduce heat and simmer until thickened, stirring often. Set aside.
Now to prepare the dry rub! Oh yeah! How I love a dry rub :) Okay, so grab yourself a small bowl and your measuring spoons. Might as well have a fork handy too, so you can combine all these ingredients really well.

The goods
  • 1/2 Cup Paprika

  • 1 tbsp granulated sugar
  • 1 tsp salt

  • 1 tbsp. cumin

  • 1/2 tsp coriander

  • 1/2 tsp cayenne pepper

  • 1/4 cup granulated garlic
  • 1 tbsp freshly ground black pepper

  • 2 tbsp. dried oregano

Blend the dry ingredients together and set aside. Now get your ribs ready...unwrap them from the packaging and pat dry with a paper towel. Place the ribs onto a baking tray and cover generously with the dry rub. Pop them into a preheated 425 degree oven for a good 45 minutes. Turn the ribs over if you can using tongs rather than a fork...gotta keep all the juices inside them suckers!!


Now that your ribs are cooking and getting *that* much closer to landing on your plate, we gotta get that BBQ sauce ready. Grab that saucepan and get a sauce brush.

*here's a tip, keep two brushes in your collection. One for sweet sauces and one for savory. That way your pastries won't taste like BBQ sauce!*

Slather on that heavenly sauce you've so painstakingly created and tuck the ribs back into the oven to bake a bit more (like 10-15 minutes). Yank 'em back out and put on the last of the BBQ sauce and throw them back into the oven for an additional 15 minutes.


While the ribs are cooking, get a non-stick pan and carefully toast 1/2 cup of poppyseeds. Be really careful that you don't burn them! You can't see the color change but they will become fragrant. That's how you'll know to remove them from the heat and pour into a medium sized bowl.
Now, if you're good at planning ahead, grab a head of garlic, slice the top off, drizzle generously with olive oil and wrap up in a foil packet. Put it in the oven for 20 minutes. Remove foil packet and carefully unwrap. Squeeze out roasted garlic bulbs & mash with a fork. Add to poppyseeds.

If you are like me and forgot to buy a head of garlic, grab the trusty bottle of minced garlic and saute on in a frying pan with a generous amount of olive oil. Once they begin to brown, get 'em off the heat or they'll burn. It only takes seconds to turn from beautiful toasted brown to yucky burnt. Once they're perfect, add to the poppyseeds.

Meaure out 1 cup of orzo and add to a small saucepan with hot olive oil. Carefully toast the orzo for a few minutes until some of the noodles begin to brown. Add 2 cups of water or broth and cook until tender. Carefully spoon into the bowl holding the garlic & poppyseeds and toss very gently.

Serve up those ribs & orzo and enjoy!


Wednesday, November 24, 2010

Love it | Hate it - Tapioca Pudding

So my husband has an affection for starchy foods, particularly starchy desserts. Rice pudding is a fave as well as what I made today. Tapioca pudding. Personally, I think it's nasty but it makes him profess his love to me in languages I never even knew he could speak. So I guess it's not all bad, right?

A few years ago I mastered rice pudding (sans raisins because the hubs cannot stand cooked raisins in anything) and was kind of avoiding tapioca pudding because it's really hard to make foods that I don't like and I honestly think those icky little tapioca pearls are disgusting. Gluey, chewy and fish-eyeball-ey. But the hubs loves it so away we go!

The Gear
  • medium saucepan
  • wooden spoon
  • small mixing bowl
  • fork
  • bread pan or another prettier dish to serve the pudding in
The Goods
  • 1/2 Cup small tapioca pearls
  • 3 cups milk (the more cream, the better)
  • 1/4 tsp. salt
  • 3 eggs
  • 1/2 Cup sugar
  • 1/2 tsp. vanilla
Start out by combining the milk, tapioca pearls & salt in medium saucepan on the stove over medium high heat. Do not abandon your post! Stir constantly until boiling and take care to not let the milk scorch. Simmer for 5 minutes and gradually add the sugar.


In your mixing bowl, crack 3 large eggs. Beat thoroughly. Carefully add approximately 1 cup of the hot tapioca mixture to your beaten eggs. This will help bring the eggs up to the same temperature as the tapioca and prevent curdling. Skipping this step will give you more or less scrambled eggs in your tapioca. Nasty.

Blend the egg & tapioca mixture well and return to the saucepan. Bring the tapioca back up to almost a boil and reduce heat. Cook until nice and thick, stirring constantly. Remove from heat and stir in vanilla. Pour into serving container and allow to cool 15 minutes or so. Serve warm or chilled.


Now, I should admit... previously, I'd never tasted the stuff. I wasn't attracted by it's appearance. So I figured this was the perfect time to taste it, especially since I knew exactly what was on the ingredient list (sugar & vanilla usually make a dessert/snack win). But. It was everything I hoped it wouldn't be. Too gluey for me, the tapioca pearls are chewy and they still freak me out. Ick. Ray is over the moon but I'm still totally underwhelmed.

How do you feel about tapioca pudding? Love it or hate it?

Sunday, November 21, 2010

Simple Spaghetti

Ever eaten fresh pasta? No, I don't mean that packaged stuff at the grocery store, I mean the kind of pasta that's so fresh you cracked the eggs yourself. That kind. It sounds like it's hard to make but don't be intimidated. All you need is a fancy gadget like this bad boy and you're off to the races.

I found this shiny contraption in my Mother In Law's cupboard. It looked like it had never been used. I couldn't believe my luck! I LOVE a good kitchen gadget!! I've made fresh pasta several times using this little machine and it's such a treat to prepare and so worth the effort when it comes time for eating.

Let's get down to business...
For starters make sure your counter is super clean. You'll need more space than you think!

The Gear
  • pasta machine
  • pasta drying rack (or paper towel laid out)
  • bowl & fork
  • serrated knife
The Goods (for the noodles)
  • 2 cups white flour
  • 3 eggs
  • 1/2 tsp salt
  • 1 tsp olive oil
(for the "sauce")
  • grape tomatoes
  • black olives, sliced
  • fresh oregano (or dried if you can't find fresh, just half as much)
  • marjoram
  • garlic
  • olive oil

And away we go! Okay. Pour your 2 cups of flour out onto the counter, making a small hill. Using your fork, create a well in the center of the flour. Crack your eggs one by one into the well and beat by drawing in small amounts of flour. Add the oil. Ditch the fork and use your fingers to incorporate the flour into the eggs. The dough should be smooth & elastic, not crumbly. If your dough is too stiff or dry, add tiny quantities of water...conversely, if it's too wet, add a little flour until the right consistency is reached.


If you find that your dough has stuck to the counter, use a dough scraper to get the stray bits loose. Knead the dough until fairly smooth (about 10 mins). Divide the dough into four equal parts. Allow the dough to rest 20-60 minutes, depending on how late you waited to make dinner! Cover the dough while resting with an inverted bowl.


Follow the manufacturer's instructions for using your pasta machine. For this recipe, I made spaghetti (I'm usually in a hurry and make fettuccini) and allowed the noodles to dry about 30 minutes.
While you wait for the noodles to dry, cut up 3-4 chicken breast halves and cook on medium-high in a little olive oil until no pink remains. I seasoned my meat with only salt & pepper but use whatever makes your tastebuds happy.

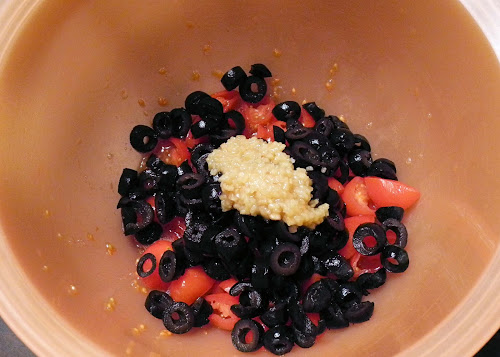
Okay, while that chicken cooks, let's deal with the "sauce". I say "sauce" because it's actually just a bunch of fresh vegetables in chunks and it's not cooked. Grab your grape tomatoes (cherry are okay too). Cut them in half and toss them into a medium sized bowl. Stick your hands in the bowl and give the tomatoes a good squeeze to let out some of the tomatoey goodness. Add about a cup of sliced black olives. Toss in a few cloves of minced garlic (I like LOTSA garlic in mine!) If you were lucky enough to find fresh oregano, chop it up roughly and throw in about a handful. Add a little marjoram (fresh if you got it!) Get that olive oil and put about 3-4 good "glugs" in with the rest of the ingredients. Toss and set aside.


Once your chicken is no longer pink, remove from heat. Put water on to boil. Add a pinch of salt and once boiling, gently place fresh noodles into the water. Cook only a few minutes (don't abandon your post!!) Keep a close eye on your noodles and check them often. Whatever you do, DO NOT RINSE YOUR NOODLES OFF!!! You want to keep the starch so the "sauce" will stick to the noodles rather than slip off.

Carefully remove the noodles from the water with a noodle server (y'know, that scooper with the claw edges and the hole in the middle) and place them into the mixing bowl with the "sauce". Toss lightly, to coat and serve in four bowls. Top with the chicken pieces and if you're feeling super adventurous finish it off with a little fresh grated parmesan and fresh black pepper.

Oh yeah, one more thing, try not to eat it too fast. Trust me, this is an important word of caution...because after it's gone, you will want more. Go on, run out to the grocery store and get the ingredients you need because this will be perfect for dinner tonight!

Tuesday, November 9, 2010

Ninja Cookin'

Do you ever find that you're just *struck* by a wave of inspiration (or maybe just hunger) when you spot food items at the grocery store? I know I do and I'm a chronic list shopper and get a littel freaked out by the idea of buying an ingredient without a solid meal plan (yep, I'm type-A all the way!) So in order to challenge myself and to step up my cookin' game, I decided to pick up a few tidbits based solely on impulse. This is what I came home with:


  • a liter of cream
  • a block of cream cheese
  • an avocado
  • a bunch of fresh baby dill
  • 3 beautiful portobello mushrooms
  • 3 shallots
  • a bit more than a pound of pork chorizo sausage (not in casing)
  • grape tomatoes
  • 2 super ripe mangoes
  • a red onion
  • a bunch of teeny tiny asparagus
  • and a bottle of whole-seed dijon mustard
I'm not a pro of any kind but baby, do I EVER like to cook... okay, I really like to eat but cookin' it gets me there.

So here's the idea. I'm gonna try to cleverly rock out some nummy stuff for noshing with these ingredients. Cookin' ninja style. Not sure what the EFF it's all gonna be but I know it'll be good!

Oh yeah, and that BBQ chicken dinner last night? It was good enough except for the part where my region is sub-zero currently and I'm only guessing here but judging by the extremely long cooking time of those dang chickens, I'm pretty sure I'll have to add one hour of cook time for every ten degrees below zero the mercury falls. Until it's so cold that the propane gels and won't turn into a gas anymore. Then we *may* have some BBQ interference. Maybe. More later on adjusting BBQ cook times for attempting outdoor cooking in the dead of winter in the Arctic Circle. Ugh. Might just hafta stick with oven-roasting for the time being.

Maybe this Ninja Cookin' thing will catch on and maybe I'll even do it more than once. Here's to hoping I dont' just eat the mangoes straight off the pit and forsake my goals of culinary awesomeness... and let's try to keep that asparagus from shrivelling up in the fridge and tossing it in the trash. K? K.

Sunday, November 7, 2010

And so it begins

Just when I was beginning to feel like I couldn't possibly heap one more thing onto my already full plate (like my food-pun??), of course, I do manage to find *just* one more. Given my most recent addition to my resume (cattle rancher), I didn't see the harm in taking on this particular commitment. Besides, if I miss a day, nobody will die, get sick or fetch me a lesser dollar at market unlike our beef herd, right?

Here's how it's all gonna go down. I will attempt to share what I cook, how I cook it and where the stuff I'm cooking comes from and if you give a rip, I'll tell you how you can get some for yourself. Actually, I'll probably tell you whether you want to know or not.

I am an accidental farmer which is a massive departure from the urban, fashion-centered life I imagined for myself in my naive highschool days. I've heard it said that folks come to the Yukon for one of two reasons. Love, or money. I came for love. My sweetie is a second generation farmer (who was, incidentally nominated as farmer of the year for 2010!) and while he tries to pretend that moving back to the Yukon was my idea, I think he wanted it worse than I did but I'm okay with taking the blame. Life really couldn't be any cooler. I swear.

Now, let's make it known at the beginning of our relationship here that I am not a delicate kinda gal. I like a good f-bomb now and again (okay, my friends are all gonna comment on here that I use it the way a teen girl uses the word "like"...well, maybe not THAT bad but you get the idea.) I will try to be sensitive to you, my readers and make an effort to express my verbal seasonings with some courtesey so just know that an "eff" will be the stunt-double for my good friend, the F-bomb. Deal? Okay.

Now that that's out of the way, let's get down to business. Let me give you a snapshot of who I am. I'm 33, mama of two boys (aged 6 1/2 and 12). I met my husband on the internet (thanks for the good times, Lavalife!) and have been married since 2003. That's a big deal these days... the being married for 7 years not the online dating. I wanted to be a fashion designer growing up. I tried it (long before the time of Etsy and all those other great online art selling meccas) and made a few bucks for a little while but holy crap, it was expensive, exhausting and cut-throat. Needless to say, I had a little burnout. I moved to the Yukon in 2007 with the fam to take over the sod farm that my hubs' parents started when he was a kid. They wanted to retire and the hubs' job in forestry had gone to hell in a handbasket (thanks for nothin', softwood lumber jerks!) so the timing was perfect for us to move up and try our hand at sod farming. I had no clue what to expect...and it's probably good that I didn't .

Fast forward a few years and we've been trying to get our hands on a few more acres (300 or so to be exact) and just when things couldn't be more exciting, the hubs' dad figures this is a good time to see what cattle ranching is like. After I recover from a mild panic attack at the thought of being responsible for a bunch of cows, we get down to the business of cattle ranching. We fed 'em grass clippings from the farm as well as grain & culled potatoes from the Yukon Grain Farm. So these spoiled cows were eating a hundred-mile diet!

The hubs had a questionably close & friendly relationship with a few of the cows but once it was time to slaughter (which wasn't as emotional as I had anticipated) it was all business. Now we have a crapload of beef all cut & wrapped and ready for market. A little scary but exciting at the same time.

I love cooking so I have a funny feeling the next hundred meals or so just *might* include beef...but that's just a guess. On tomorrow's menu however, certified organic chickens from my friends, Cain & Michelle's farm, tiny oven roasted Yukon Gold potatoes from the Yukon Grain Farm and probably a bit of beer from Yukon Brewing. We're having the family of our youngest son's friend over to meet them. More on that later!